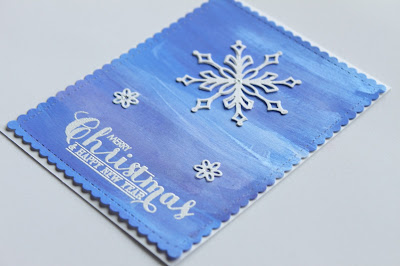
Hello and welcome! For this year's Christmas card, I decided to choose 2 products I have and see what I could made from them. For this post, I am sharing how I created 3 different card designs using this MFT Stylish Snowflakes die. Craft products are fun but the costs does add up so it would be great if we could do as much as we could with one product to get our money worth.
I know Christmas is over but I ran into
some technical issues just before Christmas and could not use my laptop and I
already downloaded the pictures into my laptop.
The first design is the Impress Emboss technique that JenniferMcGuire showed last winter. I finally got to try it out. Since this was the first time I used this die,
it was still in the original one piece it came in with all the various dies
pieces attached together. You had to use a metal clipper to separate the
various dies. I kept it as it was and lightly dabbed Versamark onto the
cutting edge of the die.
You will need to use an embossing
pad for this technique and adjust the tab on the die-cutting machine. The
Embossing pad I used was Cheery Lyn Designs Crafter’s embossing pad.
This came with 2 pads with different thickness. Most of my cards was made with
the thinner pad.
I rubbed powder tool over my card stock and very carefully
placed the MFT Stylish Snowflakes die with Versamark ink over my card. I then
ran them through my Sizzix Big Shot machine. The embossing pad protects
the card such that the die will not cut through it, instead it embossed the
image onto the card.
The Versamark ink which was on
the die was transferred onto the card. I heat embossed the card stock using
various embossing powder (Nuvo Cool Jade, Wow Metallic Silver, WowMetallic Gold rich, Nuvo Ballerina Pink).
I find the effect was
better with darker card stock. I heat embossed the sentiments from Lawn FawnTobaggan Together onto vellum, white and black card stock strip. I added
small heart die cuts next to the sentiment and placed the sentiment onto the
cards.
After making a few cards with the
die in its original one piece, I decided to cut them out and used them
separately so I can emboss the sentiment from Mama Elephant Jingle greetings
in the middle. These cards were surprisingly quick to put together and I loved
the embossing details.
For the second design, first
I watercoloured some watercolour paper with various mediums – Distresscrayons, Distress ink and watercolour. I added some Finetec pearl
onto the watercolour paper to give it some shine.
Whilst the paper was drying, I die-cut the snowflakes using glitter paper and white card stock. The snowflakes die was rather intricate and took me some time to extricate them. Once the watercolour paper was dried, I ran them through with Mama ElephantAll Prettied Up border die.
The sentiments (Mama ElephantSeason’s Greetings and Clearly Besotted Most Wonderful - discontinued) were heat
embossed onto the watercolour panel and the die-cut snowflakes was glued on.
Some of the die-cuts were layered on top of each other to give it more
dimensions.
I added some glitter glue/ Stickles onto the
snowflakes to give it some shine. I added some Ranger liquid Pearls in
gingerbread onto the peachy card for accents. Finally, I glued the finished
card onto white card base.
The third design is a
die-cut in-lay technique where I die-cut the snowflakes from the white card
stock which is the front panel for the card. The sentiment was heat embossed
onto the front panel.
I die-cut another matching snowflakes in a different colour card
stock which I fitted into the negative space of the snowflakes on the front
panel for colour contrast. Snowflakes stamps from Mama Elephant Season’sGreetings was stamped using Hero Arts Soft Pool ink. Finally, the
card was affixed onto pool colour card base.
I had a few watercolour panel left
from the second design which I used for this technique. I added pink and green
Sticklers onto the negative space of the die-cut panel to give it more shine.
Most of the cards I sent to the CaringHearts Card Drive. A big thank you to Vera and team and all the volunteers for such an
amazing event that give us this opportunity to give back.
I hope you enjoyed today’s post
and will give this technique a try. See you soon.


No comments:
Post a Comment